Other Advanced Tasks
While you will handle karaoke files, you will potentially encounter the need to perform tasks which are somewhat complex. We are listing some of those to help you.
Warning
If you struggle with command lines, we recommend coming back if you either need these task or feel more confident with command lines.
Install tools
You will need some tools to continue.
Bash
Bash is, in layman’s terms, a windows console but more powerful, and has an advanced scripting system compared to the traditional Windows (CMD.exe)
With Linux or macOS Bash or zsh are the default shells.
For windows users, you can download it here. Once the software is installed, all you need to do to start it, is go inside a folder of your choice with the file explorer and right click in an empty space and then select Git Bash.
With windows 10, an alternative is to use the Linux subsystem that enables you to use bash and install ffmpeg easily.
ffmpeg
ffmpeg is used only via command line (even if some versions with user interfaces are availaible).
Download the latest version for your OS on the official website. A numbered version with static linking will be enough. Note that if you use a package system you will easily find ffmpeg there.
- For Windows : Chocolatey
- For macOS : Homebrew
- For Linux : It depends on your distributions, but some package a very old version of ffmpeg.
Usage example under Windows
When you need to apply a script line to one or several files, all you will have to do is:
-
Copy the file in the folder along with ffmpeg.exe
-
Open (Git) Bash by right clicking into the directory then select Git Bash Here
-
Write the Git Bash script line that you want to use and then hit enter.
Video
Changing the video container (for example convert from .avi to .mp4)
./ffmpeg -i "YourOriginalVideo.avi" "out.mp4"ffmpeg allows you to change a video container easily, but you can also use this to convert a video to an mp3.
Replacing audio
For one reason or another, you might want to replace the audio of a video.
For instance, when adding off-vocal versions, it’s preferable to have the audio synced with the parent karaoke.
Another example would be exchanging the audio of an Insert Song with disruptive sound for a clean audio provided by e. g. a CD.
A last example would be simply replacing for a better audio quality.
To replace audio, it is best recommended to use lossless audio formats like .wav, .flac or .alac
To do just that without affecting the video quality, here are some instructions you can follow:
First off, you will need a Digital Audio Workstation (DAW). Here are some DAWs that can do the job:
- https://www.audacityteam.org/download/ (Free)
- https://www.reaper.fm/ (Free 60-day trial)
Next, you will need to open your preferred DAW and add two tracks, one for your source and one for the replacement audio.
Leave the source track in place and line up the replacement audio so that the two tracks sound in sync.
Now, delete the source track and render the project with the settings you want. Just remember that you cannot do better than the quality of your replacement audio.
Finally, you need to add the audio you rendered to the media file. To do that, open a command prompt in the right folder and use ffmpeg with a command like
ffmpeg -i "the-media-source.mp4" -i "your-replacement-audio-file.m4a" -map 0:v -map 1:a -c copy "output-file.mp4" This command can be broken down as follows:
-
-i "the-media-source.mp4": addthe-media-source.mp4as the first input file. -
-i "your-replacement-audio-file.m4a": addyour-replacement-audio-file.m4aas the second input file. -
-map 0:v: use the video from the first input file. -
-map 1:a: use the audio from the second input file. -
-c copy: do not reencode anything (copy the input streams). You could also use more complex instructions like-c:v copy -c:a aac -b:a 192kto reencode the audio at this step rather than in your DAW. -
"output-file.mp4": output the result in a file namedoutput-file.mp4.
Creating a synced off vocal version, step by step
When creating an off-vocal version of a karaoke, we strongly advice it to be in sync with the original karaoke - that means for the sound to start and end at the exact same moment as the original version with vocals. This makes working with it easier later, as we can use the same subtitles (.ass) without having to shift times. Also if in the future multiple audio track for one video will be implemented in Karaoke Mugen, it is going to be required that all versions are perfectly in sync for them to be played correctly.
For this procedure you’ll need:
- The original song with vocals. Can be any video (.mp4, .mkv, etc.) or audio file (.mp3, .m4a, etc.), for example taken from a Karaoke Mugen repository.
- An off-vocal verison of the song. You sometimes find the official instrumentals on CD releases, limited editions, video streaming sites (like youtube, niconico, etc) or specificly for vocal synthesizer (vocaloid) songs on piapro. It’s recommended to use a lossless format like
.wavor.flac. Note that not for every song an official instrumental version has been released.
Place both files into the same folder.
You’ll also need these free tools:
Now you’re ready to create a synced off vocal version. We’ll first trim the offvocal version to be in sync with the original version and then merge the audio into a new file.
- Open Audacity
- Drag the original video or audio into the timeline
- Drag the off vocal video or audio into the timeline
- You should see both tracks on the timeline now. Choose either a time in the song where only instrumentals are played and no voice can be heard on both tracks or where there is a visible peak on both tracks
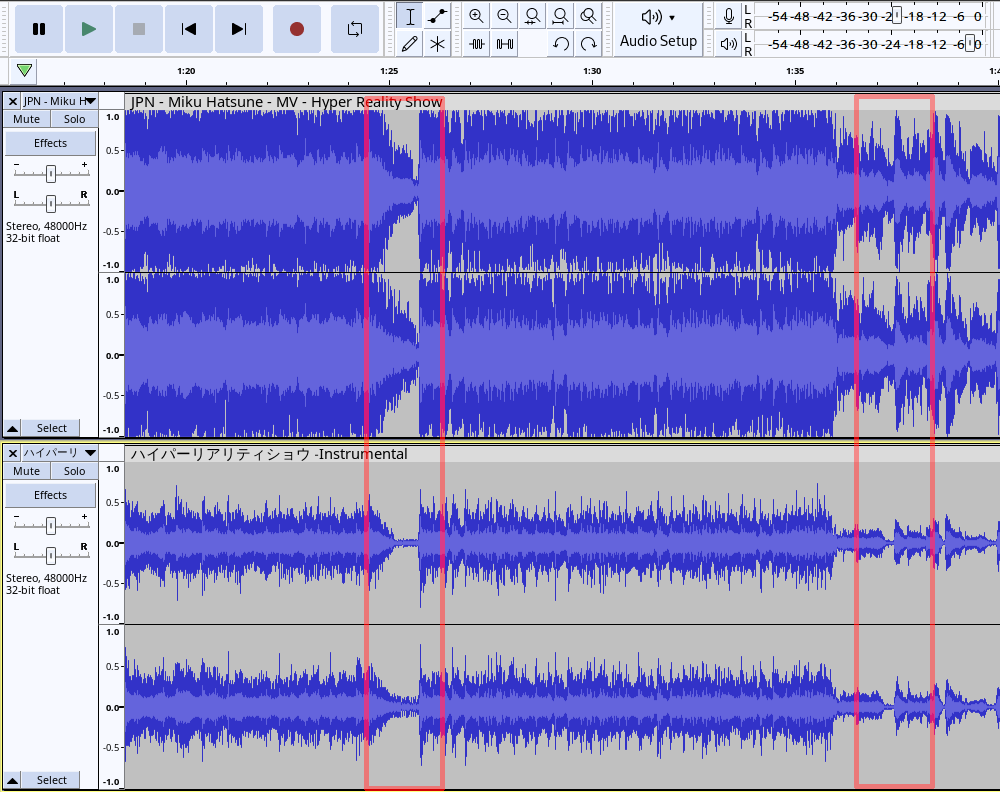
- Zoom into this area until you see the the individual waves (press
ctrlwhile scrolling with the mouse) - Observe the difference of both tracks and move the lower track until both tracks are in sync. Note: Dragging the bar above the track can be used to move a track forward and backward
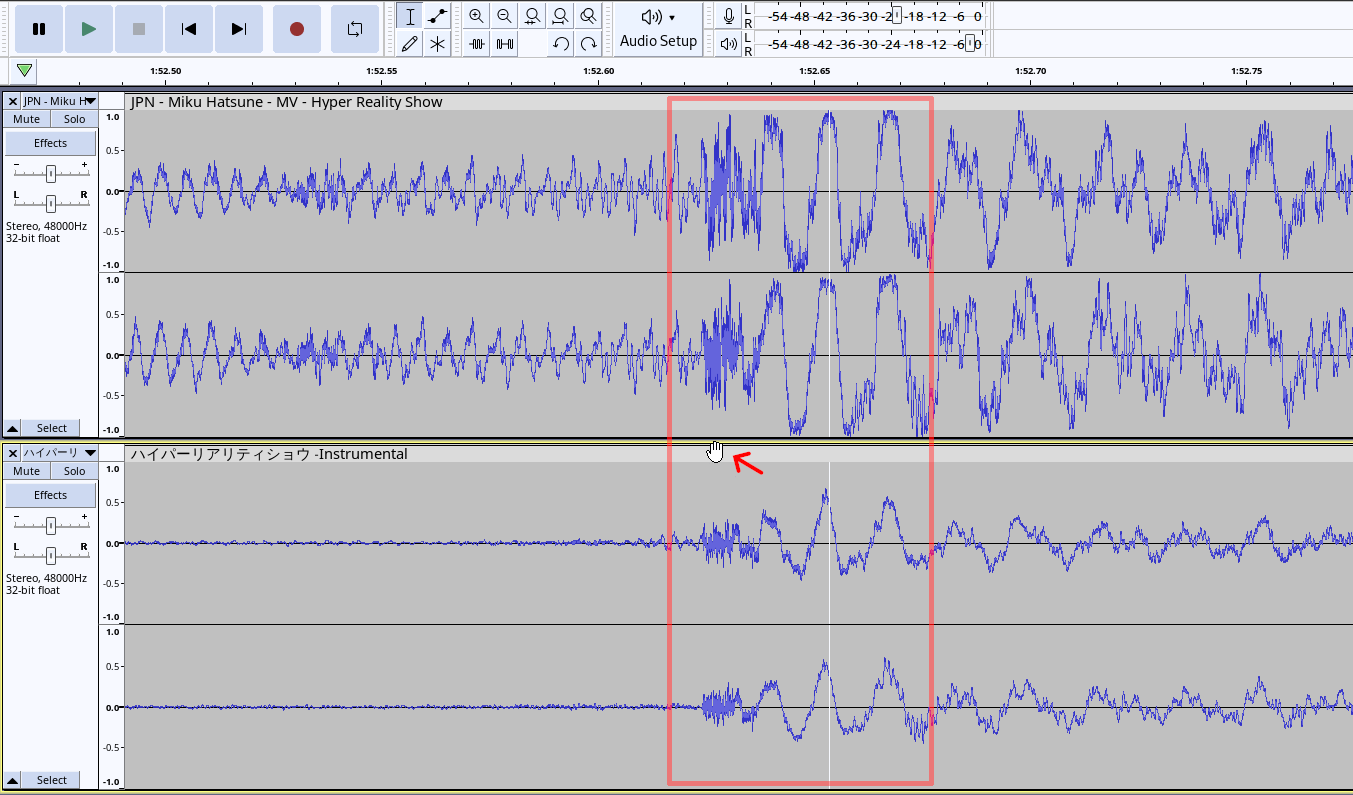
- Play the audio and listen if the audio is matched correctly
- Delete the upper track which contains the voice by pressing the x button on the upper left
- Export the audio on the top menu File > Export > Export Audio. Name it
offvocal.flacand save it in the same folder as the other two files. Confirm all dialogs until the file is saved. - Open a terminal (cmd, powershell, bash, etc.) and navigate to the folder with the audio files.
- Execute
ffmpeg -i "originalfile.mp4" -i "offvocal.flac" -map 0:v:0 -map 1:a:0 -c:v copy -c:a libopus -b:a 128k -shortest newinstrumentalfile.mp4 while replacing originalfile.mp4 with the name of the original file with vocals. Confirm with enter.
- Done! You’ll find the newly created offvocal file as
newinstrumentalfile.mp4in the same folder. Check if it plays correctly.
Bonus: Integration in Karaoke Mugen You don’t need to fill out the form again for an offvocal version of an existing karaoke. Simply open the form and insert the original version in the parent field first. All fields should be automatically filled out and you only have to check the “Off-vocal” tag in versions.
Convert a lot of videos at once
webm to mp4 for example
ls *.webm >webm.txtthen
while read file ; do f=`basename "$file" .webm`; ./ffmpeg -i "$file" "$f.mp4" ; done < webm.txtExtract subtitles from a mkv
./ffmpeg -i "YourVideo.mkv" "out.ass"Extract subtitles from a lot of mkvs
ls *.mkv >mkv.txtthen
while read file; do f=`basename "$file" .mkv`; ./ffmpeg.exe -i "$file" "$f.ass" ; done < mkv.txtFixing duration
You need to re-encapsulate the media like this:
ffmpeg -i video_source.mp4 -vcodec copy -acodec copy video_destination.mp4Fixing ratio
A video may display correctly, but karaoke is stretched or letters are missed when filling in. This is usually a ratio problem.
ffmpeg or ffprobe indicate this ratio, the SAR (Sample Aspect Ratio).
For example:
ffprobe kochoneizer.mp4
Input #0, mov,mp4,m4a,3gp,3g2,mj2, from 'kochoneizer.mp4':
Metadata:
    major_brand     : isom
    minor_version   : 512
    compatible_brands: isomiso2avc1mp41
    encoder         : Lavf58.76.100
Duration: 00:01:31.76, start: 0.000000, bitrate: 1843 kb/s
Stream #0:0(und): Video: h264 (High) (avc1 / 0x31637661), yuv420p(tv, smpte170m/bt470bg/bt470bg), 720x576 [SAR 64:45 DAR 16:9], 1710 kb/s, 25 fps, 25 tbr, 12800 tbn, 50 tbc (default)
    Metadata:
    handler_name    : VideoHandler
    vendor_id       : [0][0][0][0]
Stream #0:1(und): Audio: aac (LC) (mp4a / 0x6134706D), 48000 Hz, stereo, fltp, 127 kb/s (default)
    Metadata:
    handler_name    : SoundHandler
    vendor_id       : [0][0][0][0]
Look in the Stream Video line and find something like 720x576 [SAR 64:45 DAR 16:9].
The SAR is set to 64:45, for a resolution of 720×576. The DAR (Display Aspect Ratio) indicates the format (16:9 video).
The SAR parameter indicates the shape of a pixel. In video, a pixel is not necessarily square.
With the SAR set to 1:1, the pixel is square. Otherwise, a pixel is rectangular. For example, the SAR set to 64:45 indicates that the pixel is rectangular.

SAR defined at 1:1. The pixels are squared.

SAR set to 64:45. The pixels are rectangular.
Why using this SAR parameter? For various reasons.
- Use of the 16:9 format by stretching the pixels in width; extremely common practice with DVD videos.
- Reduce bandwidth usage during TV broadcasting (DVB-T), where frequently the video is broadcast in 1440×1080 and stretched (with SAR) in 1920×1080.
To calculate the output resolution, it’s very simple:
width × SAR.So 720 × (64 ÷ 45), giving 1024.
And if we divide 1024 by 576, we find 16/9 (16:9), the DAR value.
To correct the ratio of the video, it will be necessary to re-encode it using the vf scale parameter of ffmpeg and using the width calculated above:
ffmpeg -i kochoneizer.mp4 -c:a copy -c:v libx264 -vf "scale=1024:576" kochoneizer-1024.mp4Note
SAR is a name in ffmpeg. In other software, it is called PAR (Pixel Aspect Ratio). This refers to the same thing.