Advanced Aegisub
As you saw in the tutorial, we’re going to focus here on Aegisub tools for already existing subtitles.
The style manager
You can access the style manager with Subtitle > Style manager… or the pink “S” symbol in the tool bar.

The Styles Manager looks like this:
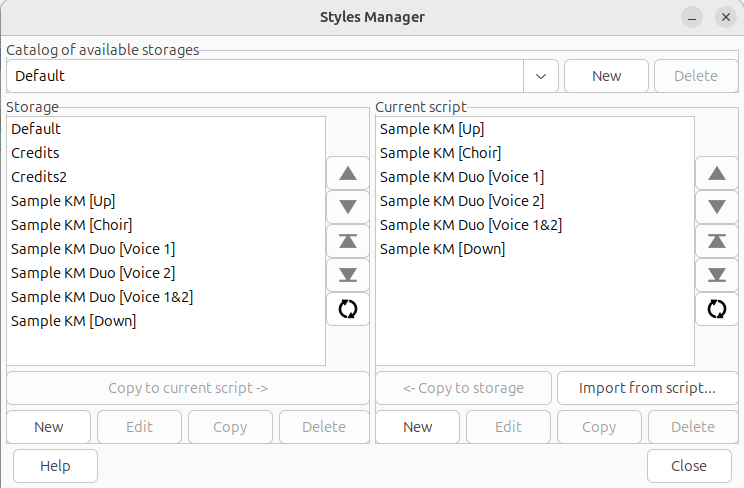
Let’s focus on the current script section. That’s where you change the styles that you wish to use for your subtitles. You can edit them, copy them in Storage, sort them by alphabetically (circle symbol), change the order, delete them or copy them to create new styles.
The Storage on the left is your default set of styles that will be copied to any new Aegisub file. Additionally, you can access these styles for any ASS file you open, e. g. to copy them in there if needed.
You can migrate styles between storage and current script by selecting them and then use the buttons Copy to current script -> and <- Copy to storage.
The -furigana styles
The “-furigana” styles are automatically generated from the base styles when applying an automation script. Karaoke Mugen will remove them automatically when the ASS file is integrated.
Modifying a style
To modify a style, double click it in the styles manager. You will then see the Style Editor:
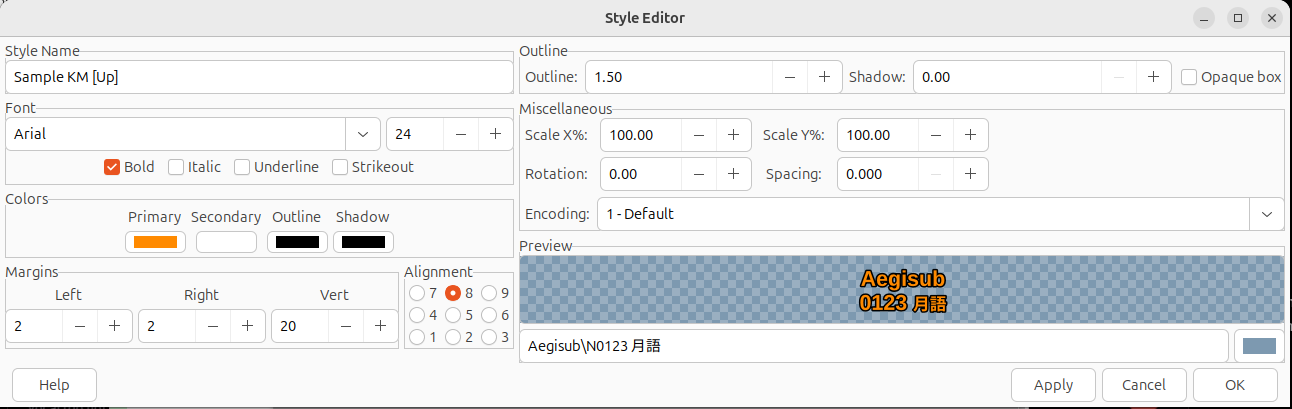
The Styles Editor has these fields:
- Style Name: Keep the default name if you have only one style, or make it shorter depending on what you want. Like “KM-Top”, “KM-choir”, etc. You’ll avoid confusing yourself with several styles.
- Font: Arial is great because it’s on every OS and contains characters for nearly all alphabets. On the right side you see the font size that is sometimes useful to adapt.
- Primary Color: This is the color visible when a syllable is highlighted – so at the time you timed it to. Don’t let yourself be confused by the name.
- Secondary Color: Color used before the syllable is due.
- Outline Color: This is the color of your text’s border.
- Shadow Color: Color for your text’s shadow. We don’t use those.
- Margins: Here you set the distance your text should have to the screen edges. Our default settings are: Left: 2, Right: 2, Vert: 20. You might enlarge these sizes but never make them smaller.
- Alignment: You can select the default alignment of your text here. We always keep it at 8.
- Outline: You can increase or reduce the size of the text’s outline and shadow here. Please always keep the shadow size at 0.00.
- Miscelleanous: You can define a global rotation, spacing and scaling here. Do not touch these values.
- Preview: Here you can see how your text looks with the current settings. You can define the text used for the preview and the background color.
About readability
Usually, you don’t need to change anything about the style except maybe primary or secondary color. Be mindful when selecting a color. Some rules of a thumb for this:
- The contrast between secondary and primary color should be good (can be checked when converting colors to grey scale).
- Avoid colors like green and red and other colors that might be indistinguishable for people with color blindness when you arrange your karaoke subtitle for multiple singers. The safest option is conversion to grey scale as well to check whether all contrasts are different enough but still easily distinguishable to white.
- Primary and secondary colors should be easily readable on the video you use for your karaoke.
- Keep in mind people can sing outdoors, on lowly-lit video projectors or with light reflecting on a screen.
Changing color
If you click on a color, the Color Selector opens:
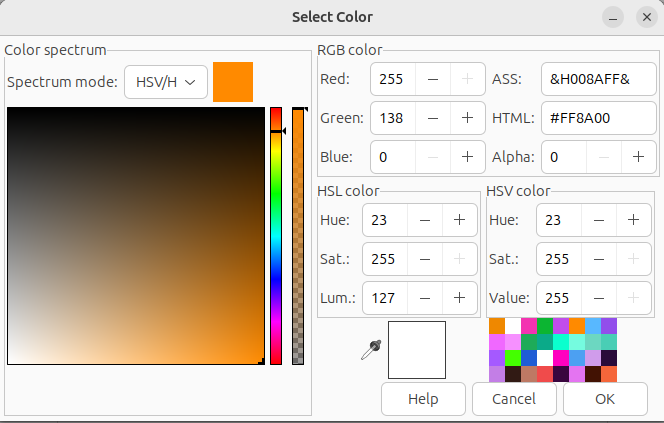
You can select different Spectrum modes. The default mode is HSV/H. To select a color, just click into the spectrum on the color you want. With the 2 bars to the right of the big square you can adjust hue and opacity. For karaoke subtitles, please leave the opacity at 100%.
Please note that ASS has its own color code starting and ending with &, e. g. &H008AFF& for orange.
Styling for multiple singers
When styling for multiple singers, the secondary color (displayed first with karaoke tags) should be unique for every singer. The primary color should then be white to have maximum contrast and visibility against the video background. Please keep the border always in black.
The example script has these rules already applied to the Duo styles:
- Sample KM Duo [Voice 1]
- Sample KM Duo [Voice 2]
- Sample KM Duo [Voice 1&2]
Note that Sample KM Duo [Voice 1&2] is additionally displayed in italics to emphasize that this color reflects both singers singing together.
Can I just duplicate lines if multiple people sing?
Sometimes you will see duplicate lines in different styles to show that multiple singers are siniging the same line. This crowds the screen a lot and is very cumbersome if you want to make larger changes to the timing later on. We do not want to see that!
For the singers to know which color belongs to which singer (groups), it is highly recommended to insert a legend at the beginning of your ASS file. Here is an example that you can copy and adapt:
Dialogue: 0,0:00:00.00,0:00:10.00,Sample KM [Down],,0,0,0,legend,{\k1000}{\k0}{\rSample KM Duo [Voice 1]}Voice 1 {\2cHFFFFFF}| {\rSample KM Duo [Voice 2]}Voice 2 {\2cHFFFFFF}| {\rSample KM Duo [Voice 1&2]}Both
If you have more than two singers, the given colors from the example script might not be enough. As it can be really challenging to select a nicely visible color that is still distinct from the other used colors, here are some example colors (those from the script included) that generally work really well:
- Orange: &H008AFF&
- Red: &H5757FF&
- Purple: &HEB4DC1&
- Light Blue: &HFFB858&
- Dark Blue: &HFF843C&
- Dark Green: &H57B857&
- Light Green: &H28D19C&
It is highly recommended to use these colors instead of any other colors.
Symbols for each singer
Symbols at the beginning of a line instead of (or along with) colors can help some people to better see who is supposed to sing. You should select symbols that are easily distinguishable from far away, e. g. ♦ ♥ ♠ ♣ ●.
Color-blind people will appreciate this! On that note, it is highly recommended to display the symbol in white as it will have the most contrast to the background. You can use the “Add Singer Symbol” automation script to add symbols very easily.
The time shift
A very useful feature for karaoke timing is the Time Shift. You can access it via the menu: Timing > Shift Times…
The following screen then appears:
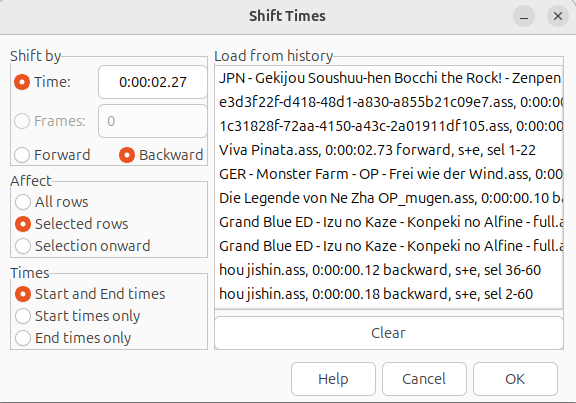
Aegisub will remember the previous selections you made in this window. You can select here:
-
Shift by: The amount of time that should be shifted in the known format of h:mm:ss.cc where c stands for centi seconds, so the 1/100th of a second. And whether it’s forward or backward.
-
Affect: The lines the shifting shall be applied to.
-
Times: Which times of the line to apply the shifting to (start/end or only one of them).
Best determine the amount of time to shift via calculating the difference of one time point from the previous and current audio. For example, if your old video had the first line start at 0:00:02.50 and the current video has it at 0:00:04.50, you need to shift all lines by 0:00:02.00 forward.
Calculating time differences
When you calculate the time difference, be careful as centiseconds have a maximum of 100 whereas seconds and minutes have a maximum of 60. Because of this, the calculation of the time difference with a calculator is not as easy as for regular numbers.
Converting subtitle speed
Sometimes it might happen that your subtitles are getting unsynced gradually during the video. That’s because the video’s FPS (Frames per second) might differ.
The most common FPS in videos are 25 FPS and 23.97 FPS, corresponding to the PAL and to the NTSC.
Follow these steps to adjust it:
- File > Export Subtitles…
- Tick Transform Framerate
- In Input framerate: the number of FPS of the original video (often 25 FPS)
- In Output: the number of FPS of the new video (often 23.97 FPS)
- Then click on Export… and test the new karaoke, without forgetting the time shift!
If it does not work in one way, always try the other one. If the value 25 and 23.97 do not work, and you’ve got no idea what the video’s FPS is… you are unlucky unfortunately! You’re going to have to re-time the whole karaoke subtitle.

Kanji Timer
If you have your lyrics timed in romaji already and want to make timed Kanji from it, the Kanji Timer that Aegisub provides can be used. You can find it via Timing > Kanji Timer…
First you need your timed romaji lyrics and additionally the corresponding kanji in a separate style. It should look like this:
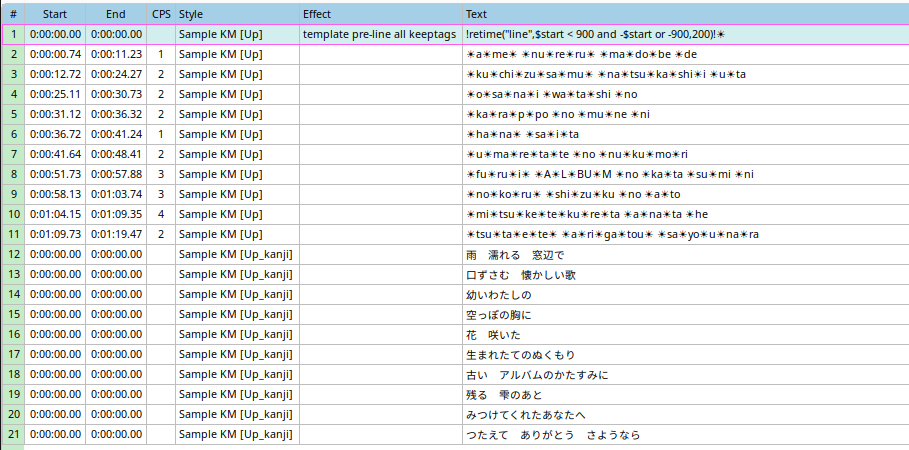
Then you open the Kanji Timer via the menu and select the respective styles as Source – romaji and Dest. (destination) – kanji.
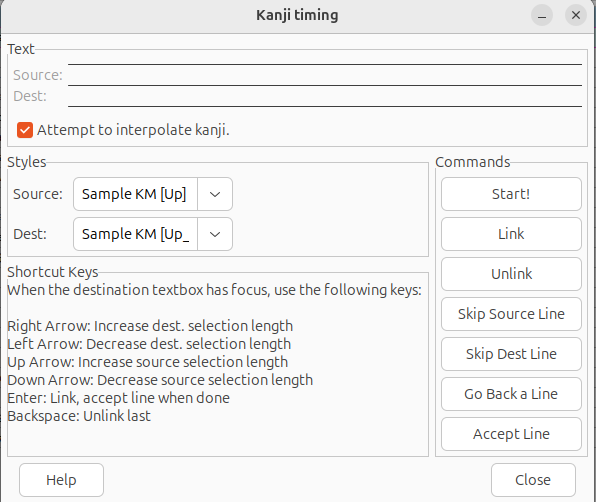
Click Start! on the right. Navigate the Source and Destination lines via Skip Source Line and Skip Dest Line on the right so that you see the actual first line of the script for both styles. Using the shortcuts displayed on the bottom left you can mark the syllabes to the corresponding Japanese characters. In this example you need to mark “a-me” for the first character “雨”. This will look like this:
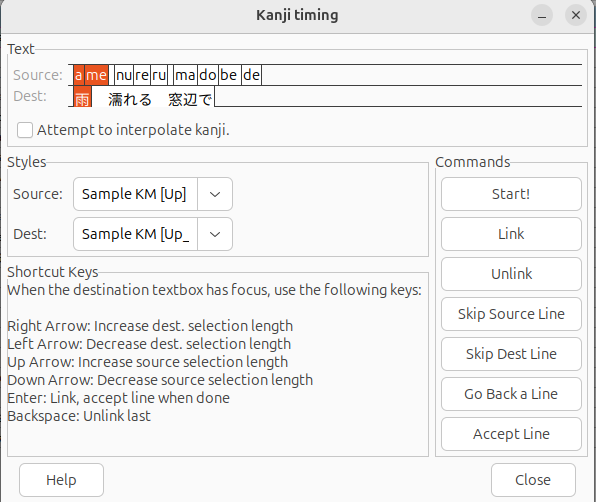
Use the arrow buttons as decribed in the Kanji Timer to mark syllables and Japanese characters and enter to accept the selection. If you don’t know which syllables belong to which kanji, you can look it up at a Japanese dictionary like jisho. It will be displayed in hiragana there though.
If you press enter at the end of a line, you get to the next line in both styles automatically. Once you finish all lines or even only a fraction, press the Close button to apply the timing of the Japanese characters to the lyrics.
If you want to insert furigana, this is not that easily done and we won’t cover it here extensively. The basic structure is like this:
{\k5}明日|あ{\k10}#|し{\k5}#|た{\k10}ま{\k7}た{\k10}会|あ{\k4}う{\k6}時|と{\k14}#|き
If you want to know more, please consult the official Aegisub docs.
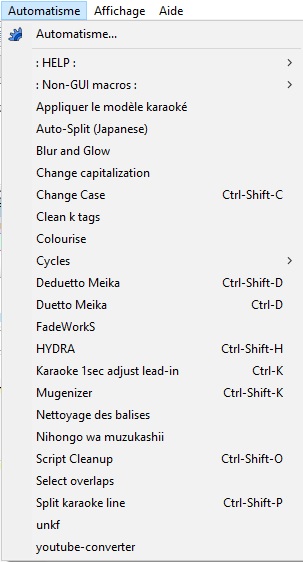
Automation scripts
Aegisub has a scripting system which can help when mass-modifying.
These are text files with the .lua file extension and there are a lot fo them on the internet.
Some of them are very useful when editing karaoke subtitles. We will explain some established ones here:
Automation script storage
To use a script, place it in this path within your Aegisub folder:
- Windows
%appdata%\Aegisub\automation\autoload - Linux
$HOME/.aegisub/automation/autoload - MacOS
$HOME/Library/Application Support/Aegisub/automation/autoload
Will the script be applied to all lines?
No. The script will only be applied to the lines selected before the script was run.
-
Clean k tags (clean-k-tags.lua): Allows you to merge useless double tags in one. For example
{\k6}{\k10}becomes{\k16} -
Nihongo wa muzukashii (wohe.lua): Exchanges Japanese particles according to our rules: o > wo; ha > wa; e > he; please note that there are exceptions to this rule which the script does not know of, e. g. ha (tooth) and e (image)
-
Double consonants (double-consonants.lua): Modifies the k tags so that the double consonants are in the right place in Japanese, e. g. ma-tta > mat-ta
-
Split karaoke line (karaoke-split.lua): Allows you to split one or more lines in two or more while keeping the syllable timing. For that, add a
{split}at the place you want the line to be separated

-
Mugenizer (karaoke-adjust-1sec.lua): Adjusts a script to a certain extend to our rules: Applies the 0x0 resolution, adds the karaoke template line, and fixes the “pre-singing splits” by readjusting the time in consequence. (see the Syllable synchronization section here)
-
auto-split (auto-split.lua): After the line timing, this script can – with one click – split syllables for you, which can help you save a lot of time. Beware, this automation only works for Japanese words. If you apply it to lines with one or more English words, it’ll try to split them letter by letter. Don’t hesitate to fix the splitting yourselves after that since it’ll split
zuttoinzu | t | toeven though you might not want to split that word in three. -
Rubyfication (rubyfication.lua): This script aims to help users that want to contribute to the Kana collection. It adds a special template line that, in combination with the multi highlighting syntax, will make sure that ruby (e. g.: furigana in Japanese) are displayed correctly when the karaoke template is applied. It also provides two variables to tweak the spacing between lines and to tweak the minimal duration for karaoke fill effect (
kf). -
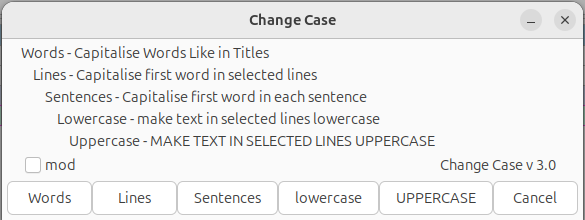
Change Case (ua.ChangeCase.lua): As displayed in the image below you have several options in the script to modify the case of your letters. Most useful are lowercase and UPPERCASE for Japanese songs for Japanese and English words, respectively. For non-transcribed languages which use capital letters at the beginning of a sentence like English, Lines is very useful.
-
unkf (unkf.lua): Exchanged all \kf to \k in the selection. Note that this does nothing to \K.
-
autokf (autokf.lua): Converts \k to \kf if the syllable is longer than 100cs. This will only work well if pauses are timed!
-
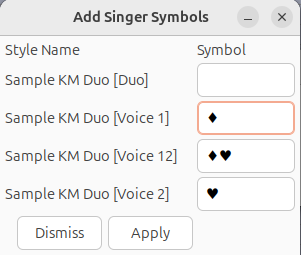
Add Singer Symbols (singer_symbols.lua): Adds a template to add a symbol at the beginning of a line per style
When the script is executed, a window opens to assign symbols for each style. Some symbols will be prefilled. You should adjust them according to your preferences and leave it empty for fields that do not need symbols.
The script then adds template lines for each style according to your input which looks something like this:

If you have lines where a subunit of your group sings that use one consistent style, you can also adjust this template manually to use the characters defined in the Actor field as symbols. Please use the following template for that:
Comment: 0,0:00:00.00,0:00:00.00,Sample KM Duo [Duo],,0,0,0,template pre-line keeptags,!retime("line",$start < 900 and -$start or -900,200)!{!$start < 900 and "\\k" .. ($start/10) or "\\k90"!\fad(!$start < 900 and $start or 300!,200) }!"$actor" and "$actor "!
Please note that by default the symbols will be displayed all white the whole time when using the script.